வெள்ளி, 23 நவம்பர், 2012

Blogger-ல் படங்களுக்கான 1GB கொள்ளலவு முடிந்ததா? இதோ இருக்கிறது Dropbox

பிளாகர் –ல் படங்களை அதிகமாக பதிவிடும் பதிவர்கள் பொதுவாக சந்திக்கும் முக்கியமான பிரச்சனை  Google வழங்கும் 1GB மட்டும் கொள்ளலவு.

அதிகமாக படங்களை பயன்படுத்தும் பதிவர்கள் தங்களது படங்களை
இலவச File Hosting தளங்களில் சேமித்து அதன் தொடர்பபை Blogger-ல் பயன்படுத்தி கொள்ளலாம்.

உதாரணத்திற்கு DropBox சேவையை பயன்படுத்தி தங்களது பிளாக்கில் படங்களை பதிவிட


முதலில் DropBox-ல் பதிவுசெய்துகொள்ளவும் (ஏற்கனவே உங்களிடம் DropBox Account இருந்தால் நன்று. இல்லையென்றால் இங்கே கிளிக் செய்யவும்
Get Free Dropbox Account).


பின்னர் பதிவிடவேண்டிய படங்களை DropBox-ல் “Public” Folder-ல் சேமித்து கொள்ளவும். (Public Folder திறந்து சேமிக்கவேண்டிய படத்தினை கிளிக் செய்து இழுத்து உங்கள் Browser Window-வில் விடவும்)


இப்போது DropBox-ல் சேமிக்கபட்ட, Blogger-ல் பதிவிடவேண்டிய  உங்கள் படத்தின் மீது Right Click செய்து Copy public link என்பதை கிளிக் செய்யவும், அதில் தோன்றும் லிங்கை Copy செய்தபின்னர்


Blogger-ல் வழக்கம் போல Insert Image –யை கிளிக் செய்து Upload என்பதற்கு பதிலாக From a URL என்பதை தேர்ந்தெடுக்கவும் அதில் முன்னர் Dropbox-ல் Copy செய்த லிங்கை Paste செய்யவும்.


இனி உங்கள் வலைப்பூ வழக்கம் போல் செயல்படும். Google-ன் 1-GB கொள்ளலவை நினைத்து கவலை கொள்ள தேவையில்லை.

================================================================

வேறு ஏதேனும் சந்தேகங்கள் இருந்தால் பின்னூட்டமிடவும் அல்லது தொலைபேசவும் 9962879268

நன்றி


-ச. இரா.சி

செவ்வாய், 7 பிப்ரவரி, 2012

Print Spooler Stopping Automatically in Windows XP and Windows 7 – How to Fix it?

Just I wanted to update this post which worked for me recently to solve print spooler stopping automatically in Windows 7 computer. Cleaning the print spooler in command prompt, disconnecting all printers and checking proper driver installation did not work. Finally, deleting the files in  Windows -> System32 -> Spool -> Printers folder worked in Windows 7.
Still its worth to try all below steps to solve print spooler stopping automatically in Windows 7, XP and Windows Vista computers.
If you get a message "The print spooler service is not running" always when try to print or open printer properties that means something wrong with print spooler service on your computer.
Print Spooler Stopping Automatically
We can start, stop or restart Print Spooler service by following two methods.
1) Under Services in Computer Management.
Print Spooler Stopping Automatically
2) Open command prompt ( Open as Administrator in Windows Vista) and,
To stop print spooler, type;
Net stop spooler
To start print spooler, type;
Net start spooler
netstop
You can try above steps if you think print spooler is not responding to your print commands and print is not happening when printer is fine physically (No paper jam or any error indications on printer hardware).  These methods will help to clear the pending print jobs (print queue) also.
Try below one more method to clear print queue in Windows XP or Windows Vista.
Go to C -> Windows -> System32 -> Spool -> Printers and delete all files in side this folder. This is the location printers spool documents before sending to printers. Once you delete these files, print queue will be cleared.
spool
The above methods will help to stop, start, and restart print spool service in windows XP or Windows Vista computer, also to clear the print queue.
But, if you notice print spooler service in windows 7, XP or Windows Vista is stopping automatically all the time and disturbing your printing, then follow the steps.
1) Try the all three methods mentioned in earlier part.
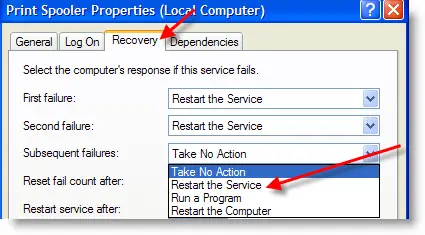
2) In Services under Computer Management, Double click Print Spooler service and go to Recovery tab. Here we can set what that service should do when it fails.
Select 'Restart the Service' in Subsequent Failures field. So, it will try restarting print spooler service whenever it fails.
recoverytab
But, from system administrators side, it's not recommended. That's why by default it set to 'Take No Action'. It will be an additional load to system to restart the service all the time whenever it fails, and  may cause other system issues also.
If a service fails very frequently, better to find the reason and fix it.
OK, let's see how we can fix this.
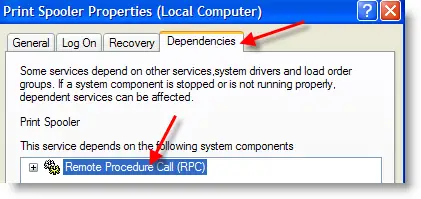
3) Go to 'Dependencies' tab and make sure all depending services are started. Luckily, only one dependency service for print spooler service which is Remote Procedure Call (RPC) service.
So, check the RPC service in services and make sure it's already started.
depend
4) Last step which fixed for me is, wrong print driver installation. Yes, if you installed and assigned wrong driver to any of the network or local printer, you may face this print spooler stopping frequently problem. I think, by default windows XP or Vista tries to communicate with printer very often even if you don't print. When printer and OS talk wrongly because of wrong driver installation, windows stop the print spooler service automatically to avoid any system issues. That is the reason print spooler stops very often.
Try these two methods,
a) Delete all unwanted printers from your computer.
b) Make sure all printers are installed with proper drivers ( or at least with similar model)
Once I changed to correct print driver, it solve my problem very easily.
Try the above methods, I'm sure one it will solve print spooler stopping automatically problem.

--
ச. இராஜசிம்மன்
9962879268

திங்கள், 30 ஜனவரி, 2012

Make Windows XP Programs Run in Windows 7

So you upgraded to Windows 7 because it's the new, cool operating system. You were excited when you first started using this new OS, but now you're frustrated. There are hundreds of dollars' worth of computer programs sitting on your desk – now useless because they were designed for Windows XP. Apparently Windows 7 does not want to run these programs. What do you do now?
Fortunately, Microsoft put a little bit of thought into XP-to-Windows 7 compatibility. The programmers created a solution: compatibility mode. This helps you run more of your XP programs in Windows 7, which will save you lots of money and frustration. Here's how to make your older software work like it should in the new operating system environment.
The nonfunctional program should have a shortcut link. Find this and right-click on it.
You should see a menu that's full of options. Left-click on "Properties."
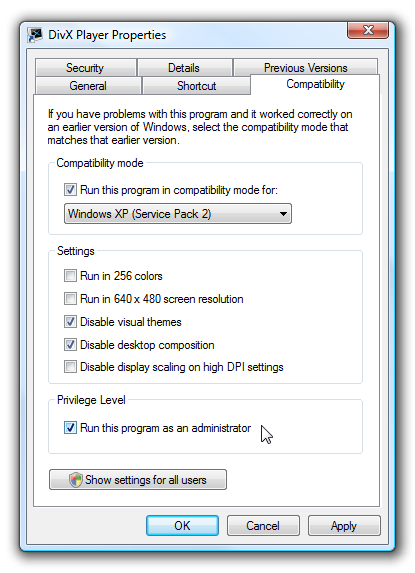
Now click the "Compatibility" tab in the menu that just popped up.
There should be a box marked "Run this program in compatibility mode for" – followed by a scrolling menu with all sorts of operating systems and options listed. Make sure that the "Run this program…" box is checked.
Now look at that huge list of operating systems and options. Click on the OS that is compatible with your program. By default, most of your software was probably designed to be compatible with Windows XP, so select that OS first.
Click "OK."
Now restart the program that you just tried to fix. In most cases, the software will run without too many more problems.
Sometimes, however, you still have trouble with the program that you're trying to run. If that's the case, you can go back to the compatibility-mode menu and change some of the options. Try selecting a different operating system from the list. Change the checkboxes beneath that list. Restart your PC, too, as that can fix the problem.
 --
ச. இராஜசிம்மன்
9962879268

How to Enter BIOS or CMOS Setup


BIOS

There are various methods for entering the BIOS or CMOS setup depending on the make, model and age of your computer. I will try and explain some of the most popular methods.

Most modern computers will require you to press one of the following keys during start up:
  • F1
  • F2
  • DEL
  • ESC
  • F10
You should press the key when you see a message such as press <f2> to enter BIOS or try tapping the appropriate key slowly during startup.
On some modern computers, pressing and holding down a key during boot will cause a stuck key error. This may give you the option to enter BIOS setup
Older computers may require one of the following key sequences during startup:
  • CTRL + ALT + ESC
  • CTRL + ALT + INS
  • CTRL + ALT + ENTER
  • CTRL + ALT + S
  • PAGE UP KEY
  • PAGE DOWN KEY
If the above suggestions do not work please check the access key lists below.
List of BIOS access keys for major computer manufacturers.
Acer – Aspire, Power, Veriton, Extensa, Ferrari, TravelMate, Altos
  • Press Del or F2 immediately after powering on.
  • The BIOS on the Acer Altos 600 server uses the Ctrl+Alt+Esc key and the F1 key for advanced options.
  • Older Acer computers may use also use the F1 or Ctrl+Alt+Esc keys to access BIOS.
Compaq – Presario, Prolinea, Deskpro, Systempro, Portable
  • Press F10 while the cursor in the top right corner of the screen is blinking.
  • Older Compaq computers may use the F1F2F10, or Del key.
Dell – XPS, Dimension, Inspiron, Latitude. OptiPlex, Precision, Vostro
  • Press F2 when the Dell logo appears. Press every few seconds until the message Entering Setupappears.
  • Older Dell desktops and laptops may instead use Ctrl+Alt+Enter or Del.
  • Older Dell laptops may use Fn+Esc or Fn+F1.
eMachines – eMonster, eTower, eOne, S-Series, T-Series
  • Press Tab or Del while the eMachine logo displays on screen.
  • Other eMachine computers may use F2.
Fujitsu – LifeBook, Esprimo, Amilo, Tablet, DeskPower
  • Press F2 once the Fujitsu logo appears.
Gateway – DX, FX, One, GM, GT, GX, Profile, Astro
  • Press the F1 key repeatedly after restarting the computer.
  • Some older Gateway computers use F2.
Hewlett-Packard (HP) – Pavilion, TouchSmart, Vectra, OmniBook, Tablet
  • Press the F1 key after restarting the computer.
  • HP Tablet PCs may use F10 or F12.
  • Other HP computers may use the F2 or Esc keys.
IBM - PC, XT, AT
  • Press F1 immediately after powering on the computer.
  • Older IBM computers (including some laptops) may use the F2 key.
Lenovo (formerly IBM) – ThinkPad, IdeaPad, 3000 Series, ThinkCentre, ThinkStation
  • Press F1 or F2 after powering on the computer.
  • Older Lenovo products use Ctrl+Alt+F3Ctrl+Alt+Ins, or Fn+F1.
Micron (MPC Computers) – ClientPro, TransPort
  • Press F1F2 or Del immediately after powering on the PC.
NEC - PowerMate, Versa, W-Series
  • Press F2.
Packard Bell - 8900 Series, 9000 Series, Pulsar, Platinum, EasyNote, imedia, iextreme
  • Press F1F2, or Del.
Sharp – Notebook Laptops, Actius UltraLite
  • Press F2 after the computer starts.
  • Some very old Sharp PCs require a Setup Diagnostics Disk.
Shuttle – Glamor G-Series, D'vo, Prima P2-Series, Workstation, X Mini XPC, Surveillance
  • Press F2 or Del on startup.
Sony – VAIO, PCG-Series, VGN-Series
  • Press F1F2 or F3 after turning on the computer.
Toshiba – Portégé, Satellite, Tecra
  • Press F1 or Esc after powering on.
List of BIOS access keys for major motherboard manufacturers.
abit – ab9, an7, an8, av8, aw9d, be6, bh6, ic7, in9, ip35, kn8, kn9, etc.
  • Press Del while the PRESS DEL TO ENTER SETUP message is displayed.
ASRock – 4coredual, 775dual, 939dual, k7s41gx, p4v88, k7vm3, etc.
  • Press F2 right after the computer starts up.
ASUS – p5b, a7v600, a7v8x, a8n, a8v, k8v, m2n, p5k, p5n, etc.
  • Press Del right after starting the computer. A few ASUS motherboards use Ins instead.
BFG – 680i etc.
  • Press Del when the enter setup message briefly displays at the bottom of the screen after powering on the computer.
BIOSTAR – 6100, 550, 7050, 965pt, k8m800, p4m80, ta690g, tf7050, etc.
  • Press the Del key while the full screen logo is showing on screen, immediately after starting the computer.
DFI – LANParty Ultra, Expert, Infinity 975x, NF3, NF4, cfx3200, p965, rs482, etc.
  • Press the Del key when the Press DEL to enter setup message appears, immediately after the memory test.
ECS Elitegroup – k7s5a, k7vta3, 741gx, 755-a2, 945p, c51gm, gf7100pvt, p4m800, etc.
  • Press either the Del or F1 key.
EVGA - 790i, 780i, 750i, 680i, 650i, e-7150/630i, e-7100/630i, 590, etc.
  • Press Del immediately after powering on the computer.
Foxconn – c51xem2aa, 6150bk8mc, 6150bk8ma, c51gu01, etc.
  • Press Del.
GIGABYTE – ds3, p35, 965p, dq6, ds3r, k8ns, etc.
  • Press Del during POST (Power on Self Test), right after the computer is turned on.
Intel - d101ggc, d815eea, d845, d850gb, d865glc, d875pbz, d945gccr, d946gtp, d975xbx, etc.
  • Press F2 during the initial boot process.
JetWay - jm26gt3, ha04, j7f3e, hi03, ji31gm3, jp901dmp, 775gt1-loge, etc.
  • Press Del immediately after powering on.
Mach Speed – Viper, Matrix, pm800, 917gbag, v6dp, s755max, etc.
  • Press Del after the boot process begins.
MSI (Micro-Star) – k8n, k9n, p965, 865pe, 975x, k7n2, k9a2, k8t neo, p7n, p35, x48, x38, etc.
  • Press Del while the Press DEL to enter SETUP message displays on screen after powering on the computer.
PCChips – m810lr, m811, m848a, p23g, p29g, p33g, etc.
  • Press Del or F1.
SAPPHIRE – PURE CrossFire 3200, a9rd580Adv, a9rs480, CrossFireX 770 & 790FX, PURE Element 690V, etc.
  • Press Del after powering on.
Shuttle – "bare bones" and motherboards including ak31, ak32, an35n, sn25p, ai61, sd37p2, sd39p2, etc.
  • Press Del or Ctrl+Alt+Esc at the Press DEL to enter SETUP message that appears right after turning on the computer.
Super Micro – c2sbx, c2sbm, pdsba, pdsm4, pdsmi, p8sc8, p4sbe, etc.
  • Press the Del key at any time during the boot process.
TYAN – Tomcat, Trinity, Thunder, Tiger, Tempest, Tahoe, Tachyon, Transport and Bigby motherboards including K8WE, S1854, S2895, MP S2460, MPX S2466, K8W S2885, S2895, S2507, etc.
  • Press the Del or F4 key.
XFX - nForce 500 Series, 600 Series, 700 Series, etc.
  • Press Del during the boot process, immediately after the computer is turned on.
List of BIOS access keys for major BIOS manufacturers
AMI (American Megatrends) – AMIBIOS, AMI BIOS
  • Press Del when after powering on the computer.
  • Some older motherboards that use AMIBIOS may prompt for the F1 or F2 key instead.
Award Software (now part of Phoenix Technologies) – AwardBIOS, Award BIOS
  • Press the Del key to enter the BIOS Setup Utility on nearly all AwardBIOS powered motherboards.
  • Some older systems using Award's BIOS software asked for Ctrl+Alt+Esc to enter BIOS.
DTK (Datatech Enterprises) – DTK BIOS
  • Press the Esc key to enter BIOS, right after powering on the PC.
Microid Research – MR BIOS
  • Press F1.
Phoenix Technologies – Phoenix BIOS, Phoenix-Award BIOS
  • Press Del during the POST (Power On Self Test), immediately after the computer starts.
  • Many older Phoenix BIOS systems required Ctrl+Alt+EscCtrl+Alt+Ins, or Ctrl+Alt+S.
If none of the above suggestions work and you still cannot enter BIOS setup, please post your problem in the comments box for further assistance.


--
ச. இராஜசிம்மன்
9962879268